Posts

Showing posts with the label Tutorial

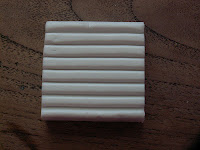
Chequered Potholders - Tutorial

Image
Made new potholders! Want to make them, too? Here's the recipe! * Chain 32 in color A * Chain 3 (this is your first trc), trc in every next chain. Don't cut of yarn at the end of the row. * Change to color B. Secure yarn to first stitch of the second row and chain 1. Sc in next 3 stitches. Now put your crochet needle in the next st of the first row. Pull up loop of yarn. Sc in next four stitches and pull up loop. Repeat until end of the row. Cut of the yarn. *  Chain 3 of color A (this is your first trc), trc in next three stitches, *skip one stitch (this stitch should be above the pulled up stitch), trc in next four stitches*, repeat * * until end of row. * Change to color B. Sc in next four stitches. Pull up a loop in the 'eye' of the loop you made two rows ago. Repeat until end of row. * Repeat pattern until you have fifteen rows of both colors.  www.betweennapsontheporch.net

Souvenirs and Speculaas

Image
Of course I brought some souvenirs from Bruges. There are a lot of artisanal shops around town, most of them making chocolates. In one of the many little narrow streets I found the most adorable bakery, that sold not only my favorite Dutch pastry called 'speculaas', but also the moulds to make speculaaspop-cookies.  I saw the same moulds a couple of weeks ago in another store, in a Dutch open air museum, but then didn't buy them and have regretted it ever since, so this time I bought them right away. And now I'm going to share the recipe for speculaas with you. I know, it isn't really the season for speculaas yet, because people normally eat speculaas in autumn and winter around here (that's The Netherlands), but now that I finally have the moulds I want to try them immediately, of course! What you need:  * 200 grams flower * 100 grams butter * 150 grams dark sugar * 150 cc water * little salt * 20 grams speculaas spices (a mix of cinnam...

Heart of Clay

Image
Last week I made this Lunch Bag , as you may have seen, and to embellish it a little I hung a heart of polymer clay from it. Today I will show you how I made the heart. What you need: Red Polymer Clay White Polymer Clay Little Eyelet Red Nailpolish Black Permanent Marker Cabochons, whatever you like Cut the banner out of the white clay and the heart out of the red clay. You can also use a cookie cutter for the heart. Fold the banner on both sides, like I did in the picture below. Stick the banner on the heart. That's all you have to do with the clay, so you can put it in the oven now (read instructions on the clay package), but don't forget to attach the eyelet before! If you try it afterwards the clay will break. After baking the clay let it cool down. When the clay is cool enough, paint the red part of the heart with nailpolish, if you like your heart shiny (optional).  When the polish has dried completely, draw the LOVE-lett...

Lavender Sugar Scrub

Image
A couple of months ago I found a recipe for Lavender Scrub at Now is Magic  and wanted to make that scrub since then. Today was the day! I bought cocos oil, lavender oil, food coloring and some nice pots. I put equal parts cocos oil and sugar in a bowl and mixed them together with a hand mixer.  After that I added a few drops of food coloring and some drops of essential lavender oil and mixed again. I put the mix in the pots and that was all it took! Only ten minutes work! You can find the whole tutorial here, at Now is Magic ! www.betweennapsontheporch.net ~*~ This week my  Twirl Dress  was featured by  Claire Justine !! Thank you so much, Claire!

Little Kittycat

Image
This week I was in my local craft store and my eye fell on the polymer clay. I always wanted to make my own cat of polymer clay and because I'm working on some larger projects, that never seem to finish, I bought some clay to finally make my cat Ronny. Small project, that's finished in less than an hour.  This is what you need: Polymer clay in the color(s) of your cat Paint (optional) My cat is totally white, so I only used white clay. For the inside of his ears, his nose and his mouth I used pink paint, for his eyes I used black paint. First make the cat's body, head, four paws, two ears, tail and four little balls for his snout (two little balls have to be a little bit larger than the other two little balls): To make the cat's snout, stick the larger little balls next to each other on the head. The chin is formed by placing one of the little balls below the snout, the nose is formed by placing the other small ball above the snout. ...

Petit Fours Crochet Along

Image
Last week I found this great post at a blog called Grietje Karwietje : a petit four crochet along! Actually it's a couple of months old, but all patterns are still there, so now I'm busy to catch up. There are seventeen patterns in total and I made seven of them by now. Here are the four that are totally finished, the other three I have to embellish with beads and stuff, so I will show them next time.  Pink Delight Petit Four Chocolate Cup with Raspberry Cream Mint Cheesecake with Chocolate Base Petit Fours www.betweennapsontheporch.net Petit Four Crochet Along 

Confetti Cookies

Image
This is what my three year old treated to her classmates this week, together with the little crocheted owls: confetti cookies! The idea for the cookies I found at Repeat Crafter Me . This is how you make them: What you need: * Cookie dough (look on the internet for a recipe, there are plenty) * Food coloring or cocoa * Lolliepop pieces ( put the lollipops in a little bag and break them with a hammer) *Icing (again, look on the internet for a recipe) * Sugar confetti After making the cookie dough cut the cookies: round cookies, which I made with a simple glass, cookies with a cut out 3 (made with the same glass and a 3 cookie cutter) and rings (made with the same glass and a smaller glass).  For the rings you can use some food coloring or cocoa, to give them a contrasting color. To do this knead some coloring through the dough. I used cocoa powder. Put all cookies on a baking sheet and fill the 3’s with the little pie...

Lunch Bag made of Soft Jaguar Pluche

Image
Today was a very good day as regards the mail! My mailbox contained: 1 . In the first place: a postcard from a good friend. And since most people send messages by e-mail, I like it when I get some real post! 2.      Fabrics!   Because you know how it is: now that I have to work on party stuff for the upcoming birthday, the only things I feel like making are things that are not really necessary at the moment and don’t have anything to do with party things at all. So I ordered some fabrics. And so I made the bag today that’s already waiting for months to be made and wouldn’t have mind if it had to wait another month to be made.  It's made of jaguar pluche and pink cotton  and is lined with dotted cotton.  It has a cover inside made of the same dotted cotton. The tutorial for this little bag I found at a blog called Pink Penguin . Very nice tutorial with a lot of pictures to make it even easier to make! www....