Tutorials
Crochet Ice Cones

2 ch
1: 6 sc in second stitch from hook (6)
2: 2 sc in every stitch (12)
3: 6 times (2 sc, 1 sc) (18)
4: 6 times (2 sc, 1 sc, 1 sc) (24)
5: 6 times (2 sc, 1 sc, 1 sc, 1 sc) (30)
6: 6 times (2 sc, 1 sc, 1 sc, 1 sc, 1 sc) (36)
7 -13: 1 sc in every stitch (36)
14: 1 sc in the back loop of every stitch (36)
Switch color
15-16: 1 sc in every stitch (36)
17: 3 times (crochet next two stitches together, 1 sc in next 10 stitches) (33)
18: 1 sc in every stitch (33)
19: 3 times (crochet next two stitches together, 1 sc in next 9 stitches) (30)
20: 1 sc in every stitch (30)
21: 3 times (crochet next two stitches together, 1 sc in next 8 stitches) (27)
22: 1 sc in every stitch (27)
23: 3 times (crochet next two stitches together, 1 sc in next 7 stitches (24)
24: 1 sc in every stitch (24)
25: 3 times (crochet next two stitches together, 1 sc in next 6 stitches (21)
26: 1 sc in every stitch (21)
Stuff the ice cream cone.
27: 3 times (crochet next two stitches together, 1 sc in next 5 stitches (18)
28: 1 sc in every stitch (18)
29: 3 times (crochet next two stitches together, 1 sc in next 4 stitches (15)
30: 1 sc in every stitch (15)
31: 3 times (crochet next two stitches together, 1 sc in next 3 stitches (12)
32: 1 sc in every stitch (12)
33: 3 times (crochet next two stitches together, 1 sc in next 2 stitches (9)
34: 1 sc in every stitch (9)
Stuff the ice cream cone further.
35: 3 times (crochet next two stitches together, 1 sc in next stitch (6)
36: 1 sc in every stitch (6) next two stitches together)
Shut the cone.
Chequered Potholders

* Chain 32 in color A
* Chain 3 (this is your first trc), trc in every next chain. Don't cut of yarn at the end of the row.

* Change to color B. Secure yarn to first stitch of the second row and chain 1. Sc in next 3 stitches. Now put your crochet needle in the next st of the first row. Pull up loop of yarn.


Sc in next four stitches and pull up loop. Repeat until end of the row. Cut of the yarn.
* Chain 3 of color A (this is your first trc), trc in next three stitches, *skip one stitch (this stitch should be above the pulled up stitch), trc in next four stitches*, repeat * * until end of row.

* Change to color B. Sc in next four stitches. Pull up a loop in the 'eye' of the loop you made two rows ago. Repeat until end of row.

* Repeat pattern until you have fifteen rows of both colors.
~*~
Speculaas Recipe
What you need:
* 200 grams flower
* 100 grams butter
* 150 grams dark sugar
* 150 cc water
* little salt
* 20 grams speculaas spices (a mix of cinnamon, ginger, white pepper and nutmeg)
Preheat oven at 175 degrees Celsius (374 degrees Fahrenheit). Mix all ingredients together and knead to a firm ball of dough.

Press dough flat on the baking tin with bakery paper in between, thickness has to be 1/2 inch. Or if you have moulds (as I do have now, YAY!!) do as beneath:

Sprinkle a bit of flower in the moulds and press dough in mould. Knock mould to worktop to release dough from mould.
Cut away the residues.

Lay the speculaaspoppen on bakery paper on baking tin and bake for about 25 minutes.

That's all! Bon appetit!
~*~
Clay Cat Tutorial
This week I was in my local craft store and my eye fell on the polymer clay. I always wanted to make my own cat of polymer clay and because I'm working on some larger projects, that never seem to finish, I bought some clay to finally make my cat Ronny. Small project, that's finished in less than an hour.
This is what you need:
Polymer clay in the color(s) of your cat
Paint (optional)
My cat is totally white, so I only used white clay. For the inside of his ears, his nose and his mouth I used pink paint, for his eyes I used black paint.

First make the cat's body, head, four paws, two ears, tail and four little balls for his snout (two little balls have to be a little bit larger than the other two little balls):

To make the cat's snout, stick the larger little balls next to each other on the head. The chin is formed by placing one of the little balls below the snout, the nose is formed by placing the other small ball above the snout.


Then place the ears. The head is now finished.

Place the four paws underneath the body.


Now place the head and the tail on the body.


The cat is now finished and can be put in the oven. You can read instructions about the temperature of the oven and baking time on the package of the clay. My clay package says 110 degrees Celsius for half an hour ( I use Fimo Clay).
After taking the cat out of the oven, let it cool off before you do the painting. I painted the inside of the ears, the nose and the lips pink and the eyes black. My cat Ronny wears a black collar with a little bell, so to make it more look-a-like I put a collar around his neck.
As you can see in this picture I not only made a standing, but also a sitting Ronny.

And here's the one and only!!

That's it! Good luck!
Confetti Cookies

This is how you make them:
What you need:
* Cookie dough (look on the internet for a recipe, there are plenty)
* Food coloring or cocoa
* Lolliepops, ( put them in a little bag and break them with a hammer)
*Icing (again, look on the internet for a recipe)
* Sugar confetti
After making the cookie dough cut the cookies: round cookies, which I made with a simple glass, cookies with a cut out 3 (made with the same glass and a 3 cookie cutter) and rings (made with the same glass and a smaller glass).
For the rings you can use some food coloring or cocoa, to give them a contrasting color. To do this knead some coloring through the dough. I used cocoa powder.
Put all cookies on a baking sheet and will the 3’s with the little pieces of lollipops. The lolliepop pieces will melt in the oven and fill the whole three.
After baking the cookies should be looking like this:

Smear the icing on the cookie rings and attach on the round cookies, like this:


The icing is used as glue, to stick the different cookies together.
Now fill the cookies with the sugar confetti.

Close the cookies by smearing icing on the ring and putting on the cookie with the cut out 3.


That’s it!
Vanes
Ch 8, sl st in the first stitch to form a ring.
Ch 8, sl st in the first stitch to form a ring.
*Ch 10, sl st in ring, ch 7, sl st in ring*; repeat * *; ch 10, sl st in ring, chain 7, sl st in first ch of 10. You should have three spaces of 10 chains and three spaces of 7 chains now.

Change color. Ch 3 (this counts as 1 dc) in 10 ch space, 3 dc in same pace, 3 dc in next space,* 4 dc in next space, ch 5, 4 dc in same space, 3 dc in next space*; repeat * *; 4 dc in next space, ch 5 and close with sl st in first ch3.

1. Ch 6 (first three count as a dc), *dc in first space between three dc of third row, chain3, dc in next space, ch 3, 4dc in next space, ch 5, 4 dc in same space*; repeat * * twice; sl st in third of 6 ch.

Change color. Ch 3 in a corner space, *3 dc, ch 3, 3 dc in next space, 3 dc in next space, 3 dc in next space, chain 3, 4 dc in corner space, ch 2, 4 dc in same corner space*; repeat * * twice; ch 2, sl st in third of 3 ch.

Change color. Ch 3 in a corner space (this counts as 1 dc), *2 dc in same space, 4 dc in next four stitches, 3 dc in next space, 9 dc in next 9 stitches, 3 dc in next space, 4 dc in next four stitches, 3 dc in next space, chain 2; 1 dc, repeat * *; 1 dc, repeat * *; close with sl st in third st of 3 chain.

Cut ten pieces of yarn of the same size and pull them all through a corner space. Bind together with another little piece of yarn.

Crochet as much vanes as you like and attach them to a line.
That’s it! Good luck!

~*~
Gunny Sack for Toys

What you need:
Piece of burlap 100cmx140cm
Piece of cotton fabric 100cmx140cm
Iron on letters
* First draw four equal pieces with a width of 35cm on the cotton, like this:

* Mark each piece at 17 ½ cm from the upper corners, like I did in the picture below, and draw lines from mark to mark:

* Cut along the lines, so that you have four pieces of fabric that look like this:

* Do the same with the burlap.
You should have four pieces of each now (four burlap, four cotton):

* Now pin two of the diagonal sides on each other, good side on good side of the fabric, about 1cm from the edge, and sew. Fold open. It now should like this:

* Do the same with the other diagonal sides, until all sides are connected. It should now look like a cross:

Do this also with the burlap.
* Now pin and sew all the long sides of the burlap, so the fabric forms a sack:

Same for the cotton.
* Turn the cotton inside out, so that the good side of the fabric is on the inside of the sack. The burlap should have the good side on the outside.
Now is the time to iron on the letters on one side of the cotton sack. Be careful to iron on the letters in such a way that if the edge of the cotton sack is turned to the outside the letters are not upside down.
Put the cotton sack in the burlap sack and sew the upper edges together, so the cotton sack stay put to the burlap sack.
Fold the edges of both sacks together to the outside, in such way that you can see the iron on letters.

That’s it! Good luck!
Play Mat
It took a while (writing a tutorial is more difficult than I thought), but here it is: the play mat tutorial! In steps:
* Draw fifteen 15x15 cm (6x6 inches) panels on cotton fabric in colors and designs you like. Cut the panels and don’t forget to cut extra on all sides for seams.

*Arrange your panels on the flour in a color pattern you like. At the picture below the rows are already pinned.

* Pin the panels in rows, as in the picture below. Lay good side on good side of the fabric, pin along the drawn lines) and sew. Fold open, until you have four panels in a row.

* Now sew the rows together (again good side of fabric on good side, pin along the lines and sew).

* All panels sewn together form the biggest part of the front side. It measures 60x75cm (24x30 inches) and looks like this:

* Cut two strips of 10x80cm (4x28 inches) and two strips of 10x95cm (4x34 inches), plus extra for seams. At both ends of the strips measure 10cm (4 inches) and draw a line from the corner to the measured point. Cut away the triangles. Your strips should now look like the ones in the picture below.
In this picture below you see black lines between the panels. It's bias band, just for decoration (it fits in my theme of liquorice allsorts), but isn't necessary at all.

* Pin the short sides of the strips on the edges of the panels (good side on good side). Sew exactly unto the corners. Unfold. At the picture below I first sewed the longer strips.

* Then sew the shorter of the strips. Pin the corners (good side on good side, pin and sew). Your front side is now finished and should look like this:

* For the back side of the play mat cut a piece of fabric of 80x95cm (28x34 inches). Pin onto the front side (again good side on good side) along the two longer edges and ONE shorter edge (just one, because otherwise you can't fill the play mat). Turn you play mat inside out. The good sides of the fabric are on the outside now.
Your play mat now should look like this. The lower side (where you see the arrow) is still open.

* Cut two layers of fiber fill of 80x95cm (28x34 inches) and fill the play mat with it (fiber fill should be flat and without bumps, of course).
Pin the inner sides of the black edges through all layers (fabric as well as fiber fill) and sew the layers together along the three edges (the red lines in the picture below; I didn't draw the red lines very neat, 'cause I'm not that good with the brush tool in Photoshop, but you get the idea). So you sew along the seam you made before when you sewed strips and panels.

* Now cut two layers of fiber fill of 60x75cm (24x30 inches) and fill the part in the middle of the play mat with it. Again the fiber fill should be flat and without bumps.
Close the bottom edge along the seam, as you did in the previous step (the red line in the picture below). The part in the middle is closed now.

* Fold the fabric of the remaining edge towards the inside of the play mat. Pin and close the play mat by sewing together.

Your playmat is finished!!
~*~
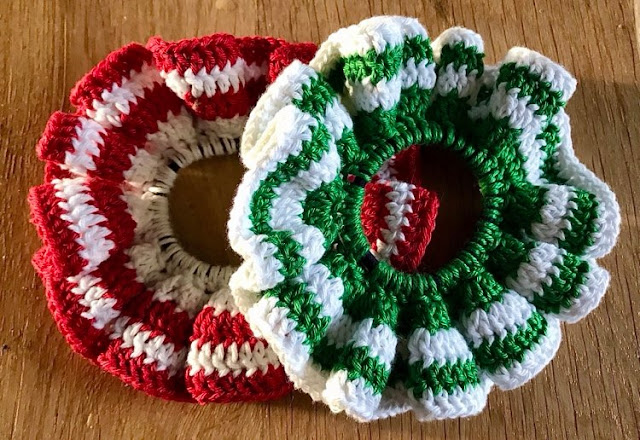
Crochet flowers
This is how you crochet the African Flowers:
1. Ch 8 and make a ring by closing with a slip stitch through the first ch.


2.Ch 2 (this is your first dc), 1 dc, 1 ch;
*2 dc, 1ch*; repeat the part between * * another four times, you should have six ‘petals’ in total. Close with a slip stitch.


3. Change color.
Ch 2 in a space (this is your first dc), dc, 1ch, 2 dc;
*2 dc, 1 ch, 2 dc* (all in next space); repeat part between * *, until six in total again.
Close with slip stitch.


4. Ch 3, 7 tc in first opening;
*8 tc in next opening* (repeat part * *, until six petals in total)


5. Change color.
With sc work around the edge of the flower. After each petal dip your hook into the space below and pick up the loop on the back side of the flower.


That's it! Good luck!
Easter Egg
I thought this long, long
winter would never end, but finally there are signs of spring around the house!
Snowdrops and purple hyacinths everywhere!
With Easter coming closer
now, I made this egg of styrofoam, little pins and green and yellow spangles and beads.


On
request of a reader here is the tutorial but unfortunately it's without
pictures to illustrate. Sorry about that, but it's quite a lot of work
to attach all the beads and spangles to the egg one by one. I don't feel
like making another one right now ('cause new, fresh project are
calling me, haha). It's very easy to make the eggs though and you don't
really need pictures.
What you need:
*styrofoam egg
*acrylic paint (I used yellow)
*spangles (I used stars, flowers and little circles)
* little beads (I used green ones)
*little pins
All the materials you need are available in craft stores.
First
you paint the egg and let it dry for a couple of hours. After that you
attach beads and spangles in a pattern you like with the pins. I hadn't a
pattern in mind, just did what came up in my head. I started with a
circle and worked around it.
Cover the whole egg, except the bottom, because that will make the egg stand upright.
Good luck!
~*~


great instruction.
ReplyDeleteso great tutorial!
ReplyDeleteThanks for the tutorial. I love this floral granny-like block!
ReplyDeleteOh my goodness this is awesome! What a great tutorial!
ReplyDeleteWe would LOVE for you to stop over and link these up in our Crafty Saturday Showcase. It is just our 2nd week. Your blog is cute and we can't wait to look around some more! I love the name of your blog!
Thank you!
Susie @Bowdabra
http://bowdabrablog.com/2012/05/12/saturday-showcase-craft-projects/
Just linked up some crafts! Thanks for inviting me! Liz
DeleteLove the flower. Always fun to try new patterns.
ReplyDeleteHi there Liz!
ReplyDeleteMy name is Stephanie and I am an Editorial Apprentice over at the site AllFreeHolidayCrafts.com. I would like to feature your Easter Egg tutorial on our site. Please email me back if this is something you are interested in! My email is slarson@primecp.com. You can go to the website www.primecp.com to see more on our company and other websites.
Thanks a ton!
Stephanie
Wow, that's a great honor! Of course I'm interested in a feature on your website! Thank you very much!
DeleteI was wondering if theres a pattern to fallow for your bunny bag I very much love it and would like to make it if theres a pattern please . Thanks ! :)
ReplyDeleteWhich bunny bag do you mean? I have made a couple of bunny bags. If you mean the tapestry bag: I googled for 'bunny, silhouette, cross stitch' and found a pattern on Pinterest that I used. I think it was this one: https://nl.pinterest.com/pin/572168327640411639/
Delete